


- Home
- Hearing Loss
- Audiology
How to make an earmold/ear impressions for hearing aids
2021-06-18Making ear impressions for hearing aids is one of the important steps in the fitting process of hearing aids. Whether the ear impressions are made correctly is related to the hearing aid effects. For example, if the ear impressions are too large, the patient may feel swollen and painful when wearing the hearing aids; Too small will cause howling problems. In addition, making ear impressions is also the most dangerous step in hearing aid fitting. If you are not careful, it may be difficult to take out the ear impressions. The preparation of ear impressions is very important. The steps and precautions for the preparation of ear impressions are listed below.
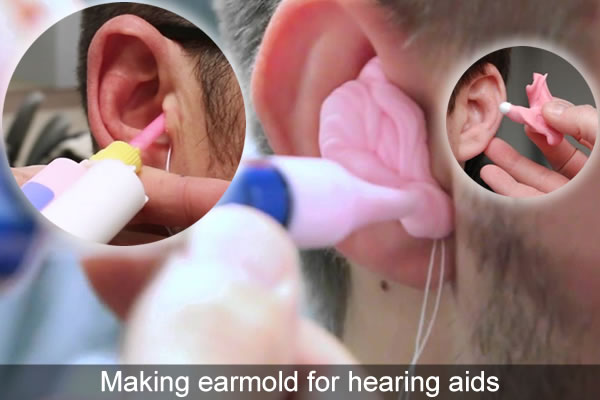
Hearing aid earmold making guide
Before making ear impressions, prepare the tools one by one, and perform alcohol sterilization on the making tools such as tweezers for the search light.
Ask for medical history
Ask the patient whether he has had ear infections, surgery, etc. in the last 3 months. In particular, some patients undergoing radical mastoidectomy will have surgical cavities, which can be filled more when filling the cotton barrier, so that the patient's surgical cavities can be filled to avoid difficulties in removal.
Check the external ear canal
First check whether the external auditory canal is red and swollen; whether the eardrum is intact; whether there is pus or inflammation; whether there is ear wax blocked and need to take it out. For inflammation and pus, let the patient seek medical treatment first, and wait until it stabilizes, and then,take an ear impression. Then check the size, curvature and direction of the ear canal to determine where to place the ear barrier.
Place a cotton barrier
First, put the cotton barrier at the mouth of the ear canal, and then slowly push the center of the cotton barrier with the head of the ear probe to push the barrier flat across the second bend of the ear canal by 2-3mm (The position of the cotton barrier can be placed according to the type of hearing aid to be made. Slightly adjusted).
Ear impression materials are mixed
The matrix of the ear impression material and the coagulant are kneaded in a one-to-one ratio in the shortest possible time, knead it into a ball, put it into the syringe as soon as possible, and push it to the tip of the syringe with the syringe core to eliminate air bubbles and extrude the front Discard the impression material about 0.5 cm long and start the injection again. For some patients with dry ear skin, especially the elderly, you can apply some baby moisturizer to the external auditory canal first to avoid damage to the external auditory canal when the ear impression is taken out.
Fill the ear canal
When injecting, always hold down the cotton barrier and pull the cord to avoid deepening into the external auditory canal due to injection pressure. The tip of the syringe is 0.5-1.0cm deep into the external ear canal (note that there is a little gap between it and the ear canal). During the injection process, the front end of the syringe must always be buried in the ear print material, so that the ear print material overflows, and the syringe is withdrawn thereafter. The injection in the ear canal needs to be light and slow; when it reaches the ear concha cavity, the injection needs to be completed quickly. After the injection is completed, do not press hard on the outside to avoid the model being too large.
Take out the ear impression
After injecting the ear impression material, you should always pay attention to the solidification of the ear impression, and lightly scratch the ear impression with your fingernail. The best time to take it out is when it can pop up quickly. It is necessary to gently pull the impression away from the auricle to allow air to enter the ear to prevent the patient's discomfort due to the negative pressure in the ear canal. Then first take out the triangular fossa area, then tighten the auricle, raise the impression slightly, move the ear impression back and forth, and gently rotate it upwards, forwards, and outwards to remove it smoothly. If you encounter flat and large curvature, you cannot use the forward and outward turning method, and you must use the method of gently lifting the lower end of the ear, pulling it gently, and stopping it.

Check the ear impression
Observe whether the whole ear impression is intact and has no defects, whether the surface is smooth without swelling, dents, cracks or bubbles; whether the external auditory canal opening, interscreen notch, and concha cavity are intact; whether the ear impression exceeds the second bend by 2-3mm; Whether the mold has complete helix casters. If there is any defect, take it again immediately and pay attention to the operation of the defective part.
Check the external ear canal
After taking it out, use an electric otoscope to carefully observe whether there is any residual material left in the ear. If there is redness and swelling, use hydrogen peroxide to wipe the ear canal. The purpose is to quickly eliminate inflammation (the pressure of injection and injection may cause redness and swelling of the ear canal). Instruct patients to take a bath or wash their hair these days, if the ear canal gets water, it should be wiped dry with a cotton swab in time to avoid inflammation.


Latest
Audiology

All 0 comments